Difference between revisions of "Tutorials/Killing Nex"
(Still WIP, will finish it this week if not tomorrow. Saving it for criticism purposes.) |
|||
| Line 144: | Line 144: | ||
|[[Statius's warhammer]] | |[[Statius's warhammer]] | ||
|[[Saradomin godsword]](if mage is in your team) | |[[Saradomin godsword]](if mage is in your team) | ||
| − | |[[Bandos | + | |[[Bandos godblade]] |
| | | | ||
|} | |} | ||
| Line 152: | Line 152: | ||
[[File:Nexguide2.png]] | [[File:Nexguide2.png]] | ||
| − | === | + | ===The fight=== |
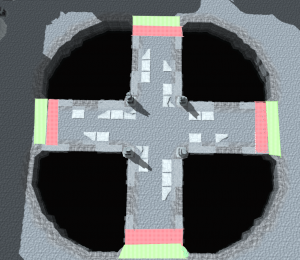
The image below shows what place you should be standing at to stop the boss from dashing, with green squares signifying where you're supposed to be standing and red squares signifying where the boss should be standing. | The image below shows what place you should be standing at to stop the boss from dashing, with green squares signifying where you're supposed to be standing and red squares signifying where the boss should be standing. | ||
| Line 185: | Line 185: | ||
== Role: Damage, Melee == | == Role: Damage, Melee == | ||
| + | |||
| + | Using melee to kill Nex has a its upsides and downsides - it has the 2nd highest potential DPS when killing the boss on and off slayer task (assuming using best gear it's 10.87 DPS off-task and 12.14 DPS on-task). It also allows you to bring Bandos Godblade and hit with it reliably enough, and using melee is also the cheapest method to kill Nex with in terms of gold lost in repairs/supplies per hit. The downside of using melee is that you can't effectively help your teammates kill minions. | ||
| + | |||
| + | === Equipment === | ||
| + | |||
| + | For the highest DPS when doing Nex off-task, it's recommended to use upgraded elite void set. On-task it's best to use a slayer helmet and upgraded bandos set. | ||
| + | |||
| + | {| class="wikitable" | ||
| + | !colspan="1"|Slot | ||
| + | !colspan="10"|Gear (most effective ---> least effective) | ||
| + | |- | ||
| + | ||[[File:Helmetslot.png|left]] | ||
| + | |colspan="1"|[[Full slayer helmet]] | ||
| + | (if on slayer task) | ||
| + | |[[Void melee helm|Void melee helm(upgraded)]] | ||
| + | |[[Bandos helm|Bandos helm(upgraded)]] | ||
| + | |[[Torva full helm]] | ||
| + | |[[Void melee helm]] | ||
| + | |- | ||
| + | ||[[File:Amuletslot.png|left]] | ||
| + | |[[Vyrewatch necklace (b)]] | ||
| + | |[[Amulet of strength (t)]] | ||
| + | |[[Amulet of glory (t)]] | ||
| + | |[[Amulet of fury]] | ||
| + | |[[Vyrewatch necklace]] | ||
| + | |- | ||
| + | ||[[File:Capeslot.png|left]] | ||
| + | |[[Lava cape (melee)]] | ||
| + | |[[Lava cape (ice)]] | ||
| + | |[[Completionist cape]] | ||
| + | |[[Max cape]] | ||
| + | |[[Combination capes|Combination cape]] | ||
| + | |- | ||
| + | |[[File:Bodyslot.png|left]] | ||
| + | |[[Bandos chestplate|Bandos chestplate (upgraded)]] | ||
| + | |[[Void knight top|Void knight top (upgraded)]] | ||
| + | |[[Torva platebody]] | ||
| + | |[[Void knight top]] | ||
| + | |[[Bandos chestplate]] | ||
| + | |- | ||
| + | |[[File:Legsslot.png|left]] | ||
| + | |[[Bandos tassets|Bandos tassets (upgraded)]] | ||
| + | |[[Void knight robe|Void knight robe (upgraded)]] | ||
| + | |[[Torva platelegs]] | ||
| + | |[[Bandos tassets]] | ||
| + | | | ||
| + | |- | ||
| + | |[[File:Weaponslot.png|left]] | ||
| + | |[[Demon halberd]] | ||
| + | |[[Chaotic rapier]](on-task) | ||
| + | |[[Demon saber]] | ||
| + | |[[Elemental whip]] | ||
| + | | | ||
| + | |- | ||
| + | |[[File:Shieldslot.png|left]] | ||
| + | |[[Dragon defender]] | ||
| + | |[[Arcane spirit shield]] | ||
| + | |[[Spectral spirit shield]] | ||
| + | |[[Dragonfire shield]] | ||
| + | | | ||
| + | |- | ||
| + | |[[File:Ammoslot.png|left]] | ||
| + | |[[Rune bag]] | ||
| + | | | ||
| + | | | ||
| + | | | ||
| + | | | ||
| + | |- | ||
| + | |[[File:Glovesslot.png|left]] | ||
| + | |[[Bandos gloves|Bandos gloves(upgraded)]] | ||
| + | |[[Steadfast gloves]] | ||
| + | |[[Bandos gloves]] | ||
| + | |[[Barrow gloves]] | ||
| + | |[[Dragon gloves]] | ||
| + | |- | ||
| + | |[[File:Bootsslot.png|left]] | ||
| + | |[[Bandos boots|Bandos boots(upgraded)]] | ||
| + | |[[Steadfast boots]] | ||
| + | |[[Bandos boots]] | ||
| + | |[[Dragon boots]] | ||
| + | | | ||
| + | |- | ||
| + | |[[File:Ringslot.png|left]] | ||
| + | |[[Ring of vigour]] | ||
| + | |[[Berserker ring(i)]](higher DPS) | ||
| + | |[[Berserker ring]] | ||
| + | |[[Ring of stone]] | ||
| + | | | ||
| + | |- | ||
| + | |[[File:Wingsslot.png|left]] | ||
| + | |[[Wings]] | ||
| + | | | ||
| + | | | ||
| + | | | ||
| + | | | ||
| + | |- | ||
| + | |[[File:Auraslot.png|left]] | ||
| + | |[[Melee III]] | ||
| + | |[[Poison heal]] | ||
| + | |[[Lifesteal III]] | ||
| + | |[[Melee II]] | ||
| + | |[[Lifesteal II]] | ||
| + | |- | ||
| + | |[[File:Specorb.png|left]] | ||
| + | |[[Saradomin godblade]](if mage is in your team) | ||
| + | |[[Bandos godblade]] | ||
| + | |[[Saradomin godsword]](if mage is in your team) | ||
| + | |[[Statius's warhammer]] | ||
| + | |[[Bandos godsword]] | ||
| + | |} | ||
| + | |||
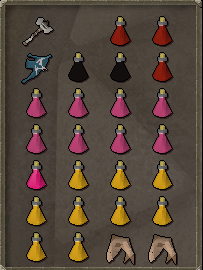
| + | As for inventory, bring overloads (the amount depends on the length of the trip), prayer renewals (bring the same amount of renewals as overloads, with 1 renewal extra), your special attack weapon, super restores (8 should do), optionally a [[spirit shields|spirit shield]] (blessed spirit shield or better, regular spirit shield won't work) to negate overload damage and the rest [[Saradomin brew|saradomin]]/[[Zamorak brew|zamorak]] brews. Don't forget a super antipoison if you're not running [[poison heal]] aura! Optionally you can also bring 2 pieces of regular food if using [[Saradomin godblade]] as the special attack weapon to make space for drops from the first kills of the trip. | ||
| + | |||
| + | [[File:Nexguide3.png]] | ||
| + | |||
| + | ===The fight=== | ||
| + | |||
| + | ====The start (Phase 1)==== | ||
| + | |||
| + | Using melee is pretty straightforward. Before the boss spawns, pray magic. At the start, don't attack the boss right away. Instead - let the tank taunt her and wait for her to come closer. That's because the boss might do the dashing attack immediately, which could potentially kill you if you're not careful. Once the boss is away from the center, start attacking. | ||
| + | |||
| + | ====Phase 2(Smoke phase)==== | ||
| + | |||
| + | Keep attacking. The boss will poison you, but a super antipoison or poison heal will make quick work of the poison. | ||
| + | |||
| + | ====Phase 3(Shadow phase)==== | ||
| + | |||
| + | Switch to range prayer. Once the boss uses the special attack which summons shadows on the floor, just move to a place without any shadows. | ||
| + | |||
| + | ====Phase 4(Blood phase)==== | ||
| + | |||
| + | Switch to mage prayer. When the boss shouts "I demand your blood!", move a square or two. Don't stand to the side of the boss, else the tank might get hit with it. | ||
| + | |||
| + | ==== Phase 5(Ice phase)==== | ||
| + | |||
| + | When the boss hits the ground with its hand, move a square. Be sure to not stand to the side of the boss else your tank might run into the special attack that was targeting you. | ||
| + | |||
| + | ====Phase 6(Zaros phase)==== | ||
| + | |||
| + | Pray range and hit the boss until it dies. | ||
== Role: Damage, Ranged == | == Role: Damage, Ranged == | ||
== Role: Damage, Magic == | == Role: Damage, Magic == | ||
Revision as of 17:22, 21 June 2021
Nex is one of the harder bosses in the game with a combat level of 1001, and is located in Zaros Section of God wars dungeon. She is usually killed for the chance of dropping Torva, Pernix and Virtus armour drops.
Contents
Requirements
- 70 Agility (Required to reach the Nex chamber, can be boosted from 66 Agility with an Agility potion)
- High Defence and Hitpoints levels (99 recommended)
- High Attack and Strength levels (99 recommended, only if using Melee)
- High Range level (99 recommended, only if using Range)
- High Magic level (99 recommended, only if using Magic)
- 75+ Prayer (for Piety, higher recommended)
- 96 Herblore for Ironmen (optional, required for Overloads)
- 71+ Invention (optional, required for Poison heal aura)
- 3 other players (having 1 tank is a MUST)
Getting there
To get inside God Wars Dungeon, it is recommended to use Ferocious ring or GWD tablet. Once there, head straight south and open the frozen door, and climb down the hole that is inside. Once down, squeeze-through the obstacle pipe (70 agility required) go further into the room and use the Big Door to join an instance. While you can go through without joining an instance, killing the boss there is not recommended due to risk of being crashed (only 4 people can get a drop) and longer respawn times.
Role: Tank
Each party should have 1 tank in their team, since it's the most vital role for Nex. A tank's job is to taunt Nex and keep it in a precise position, so she doesn't dash through one of the four lanes and potentially inflict massive damage upon the team, meanwhile soaking up the melee attacks of the boss.
Equipment
Items that are classified as for experienced are things that maximize your damage output, which leaves you with way less defensive capabilities, meaning prayer flicking its melee and ranged/mage attacks become a necessity.
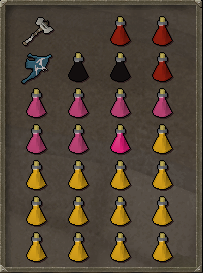
For inventory, you should be bringing overloads (amount depending on how many kills you wish to go for), prayer renewal potions (bring the same amount of renewals as you have overloads, with 1 extra potion. For example, if you're taking 1 overload, bring 2 prayer renewals, and if you're taking 2 overloads, bring 3 prayer renewals), saradomin/zamorak brews, around 6-8 super restore potions and optionally, one of the spirit shields(except for the regular spirit shield) to negate damage caused by overloads. If not using Poison purge or Poison heal auras, take super antipoison. Below is an example inventory.
The fight
The image below shows what place you should be standing at to stop the boss from dashing, with green squares signifying where you're supposed to be standing and red squares signifying where the boss should be standing.
It is ideal to kill the boss on the North side of the arena, which allows for your team fast access to the first two minions and avoids the 5th phase's minion from freezing you.
Start of the fight (Phase 1)
First thing you should always do is pray magic, taunt the boss and go straight to the green squares. If you're using melee, wait for Nex to come to you, and if you don't have a mage in your team, use Statius's warhammer special attack on the boss.
Phase 2 (Smoke phase)
In this phase, the boss will poison you. Just keep attacking, Nex doesn't have any special attacks.
Phase 3 (Shadow phase)
At the start of the phase, pray range and taunt the boss immediately. Once the boss uses a special attack that summons a bunch of shadows on the floor, if you're not using chrysos armor, you should dodge it by moving diagonally. DO NOT SIDESTEP ONTO ANOTHER GREEN SQUARE FOR ANY SPECIAL ATTACK! This will mess up Nex's positioning and you'll have to re-align her with red squares again! Instead, move diagonally onto a red square, then back.
Phase 4 (Blood phase)
Pray magic, and whenever the boss says "I demand your blood!", immediately dodge it by moving diagonally onto the red squares as before, then move back.
Phase 5 (Ice phase)
Taunt the boss. In this phase, if Nex does an animation where she punches the ground, you must dodge it like you would any other special attack from previous phases.
Phase 6 (Zaros phase)
Pray range and taunt the boss for the last time. This phase has no special attacks.
Role: Damage, Melee
Using melee to kill Nex has a its upsides and downsides - it has the 2nd highest potential DPS when killing the boss on and off slayer task (assuming using best gear it's 10.87 DPS off-task and 12.14 DPS on-task). It also allows you to bring Bandos Godblade and hit with it reliably enough, and using melee is also the cheapest method to kill Nex with in terms of gold lost in repairs/supplies per hit. The downside of using melee is that you can't effectively help your teammates kill minions.
Equipment
For the highest DPS when doing Nex off-task, it's recommended to use upgraded elite void set. On-task it's best to use a slayer helmet and upgraded bandos set.
As for inventory, bring overloads (the amount depends on the length of the trip), prayer renewals (bring the same amount of renewals as overloads, with 1 renewal extra), your special attack weapon, super restores (8 should do), optionally a spirit shield (blessed spirit shield or better, regular spirit shield won't work) to negate overload damage and the rest saradomin/zamorak brews. Don't forget a super antipoison if you're not running poison heal aura! Optionally you can also bring 2 pieces of regular food if using Saradomin godblade as the special attack weapon to make space for drops from the first kills of the trip.
The fight
The start (Phase 1)
Using melee is pretty straightforward. Before the boss spawns, pray magic. At the start, don't attack the boss right away. Instead - let the tank taunt her and wait for her to come closer. That's because the boss might do the dashing attack immediately, which could potentially kill you if you're not careful. Once the boss is away from the center, start attacking.
Phase 2(Smoke phase)
Keep attacking. The boss will poison you, but a super antipoison or poison heal will make quick work of the poison.
Phase 3(Shadow phase)
Switch to range prayer. Once the boss uses the special attack which summons shadows on the floor, just move to a place without any shadows.
Phase 4(Blood phase)
Switch to mage prayer. When the boss shouts "I demand your blood!", move a square or two. Don't stand to the side of the boss, else the tank might get hit with it.
Phase 5(Ice phase)
When the boss hits the ground with its hand, move a square. Be sure to not stand to the side of the boss else your tank might run into the special attack that was targeting you.
Phase 6(Zaros phase)
Pray range and hit the boss until it dies.


