Difference between revisions of "Lucien Van Rot"

From Emps-World Wiki
Jump to: navigation, search
Line 1: Line 1:
{{Infobox_monster |image=[[File:LucienVanRot.png|200px]] |cb= 1,312|hp= 5,000|style=[[Melee]]/[[Ranged]]/[[Magic]] |max=37/69/90 |agg=Yes |poi=No |unded = No |slay=1 |master=[[Shenven]]|xp=42,000}}
+
{{Infobox_monster |image=[[File:LucienVanRot.png|200px]] |cb= 1,110|hp= 2,600|style=[[Melee]]/[[Ranged]]/[[Magic]] |max=31/59/76 |agg=Yes |poi=No |unded = No |slay=1 |master=[[Shenven]]|xp=42,000}}
  
 
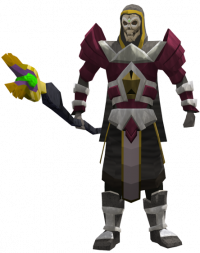
'''{{PAGENAME}}''' is the final boss of [[Rot cave]].
 
'''{{PAGENAME}}''' is the final boss of [[Rot cave]].
Line 5: Line 5:
 
He is immune to [[Rot]] and [[Poison]] damage. He is NOT considered undead even though he looks like a skeleton and is a necromancer. [[Salve amulet]] and [[Undead slayer]] does NOT work on him.
 
He is immune to [[Rot]] and [[Poison]] damage. He is NOT considered undead even though he looks like a skeleton and is a necromancer. [[Salve amulet]] and [[Undead slayer]] does NOT work on him.
  
==The fight==
+
Entering different '''Rot cave instances''' will lead to different boss difficulty.
 +
Here's the following available instance choices:
  
Lucien will mainly attack with his ranged autoattack. Praying ranged is advised throughout the entire fight. He will randomly cast a spell on his main target, spawning spikes underneath the player in a 7x7 square that will deal really high damage if the hit lands. The colour of the spikes determine the combat type it will hit as (red = melee, green = ranged and blue = magic). There are two ways to deal with this special attack. You can either switch your prayer to match the colour of the spikes, or you can simply leg it. Option number two is prefered since the attack is rather slow.  
+
*Rot cave instance (2p). Meaning only 2 players can join the instance.
  
At 4000 hp he will spawn Worcestershire (more commonly known as Wahisietel). He will attack Luciens main target with rapidly ramping poison damage. this is where you can either switch from your dps aura, to poison heal aura, or you can sip an antipoison. the first option is strongly recommended since the strong poison hits can heal high and keep you safe throughout the entire fight. (sipping an antipoison will allow you to wear your dps aura but this is only recommended if you have a lot of experience with this boss). If you aren't the main target you can simply attack him once and he'll attack you aswell.  
+
*Rot cave instance (3p). Meaning only 3 players can join the instance.
  
at 3000 hp he will spawn Akthanakoss. Akthanakoss will spawn rot zombies randomly that will quickly stack up. these zombies are more of a nuisance than anything since they are melee and you run around most of the time anyways. be aware if standing still with a lot of them stacked up on you as their attacks can end up being a problem (especially if you wear low defence equipment like [[Upgraded elite void knight armour|void armour]])
+
*Rot cave instance (4p). Meaning only 4 players can join the instance.
  
at this point he will throw out rot drops around his main target in a 7x7 square, kind of like [[Kal'Ger]]'s meteor shower. unlike the meteor shower though, this rot isn't guaranteed to land on the player every time, so to prevent covering half of the arena in rot spots, stand still until you see that the attack is going to actually land on you. he fires up to 4 rounds of rot, but it can be less if he switches targets
+
==Rot cave instance (2p)==
 +
To enter Lucien Van Rot room, you need to decrease rot percentage till 75%.
 +
To achieve that, the best way would be to kill: 9-Rot zombie, 4-Haasghenahk, 1-Shukarhazh, [[Azzandra]], [[Enakhra]], [[Akthanakos]] and lightning up tomb in the bottom floor of rot cave.
 +
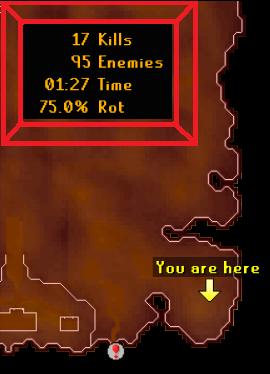
'''In the right corner you can see 2 player instance boss stats.'''
  
He will also throw out spinning axes randomly from here on out, that will bounce between players if you stand too close to eachother. it is recommended to spread out as much as possible since the attack will stop if it can't find a close player to jump to. this attacks deal around 20-25 hp of damage as melee.  
+
[[File:rottwop.png]]
 +
===Mechanics===
 +
*Lucien will mainly attack with his ranged autoattack. Praying ranged is advised throughout the entire fight. He will randomly cast a spell on his main target, spawning spikes underneath the player in a 7x7 square that will deal really high damage if the hit lands. The colour of the spikes determine the combat type it will hit as '''(red = melee, green = ranged and blue = magic)'''. There are two ways to deal with this special attack. You can either switch your prayer to match the colour of the spikes, or you can simply leg it. Option number two is prefered since the attack is rather slow.
  
At 1000 hp he will shout "i will not lose!" and then heal 600 hp, back up to 1600. Nothing else really happen here.
+
*At 2000 HP he will spawn [[Worcestershire]] (more commonly known as [[Wahisietel]]). He will attack Luciens main target with rapidly ramping poison damage. this is where you can either switch from your dps aura, to poison heal aura, or you can sip an antipoison. the first option is strongly recommended since the strong poison hits can heal high and keep you safe throughout the entire fight. (sipping an antipoison will allow you to wear your dps aura but this is only recommended if you have a lot of experience with this boss). If you aren't the target of [[Wahisietel]], you can simply attack him once and he'll attack you aswell.  
  
 
+
*At 1500 HPhe will spawn [[Akthanakoss]]. [[Akthanakoss]] will spawn rot zombies randomly that will quickly stack up. It is recommended to not focus them during the fight. Be aware high amount of rot zombies can cause serious damage when they are all stacked around you or when you are running in between them.(Especially if you wear low defence equipment like [[Upgraded elite void knight armour|void armour]]).
+
 
+
 
+
==Drops==
+
 
+
{| class="wikitable"
+
! scope="col" colspan="1" | Item
+
! scope="col" colspan="1" | Name
+
! scope="col" | Quantity
+
! scope="col" | Rarity
+
|-
+
| {{ItemImage|id=7199|caption=Admiral pie}}{{ItemImage|id=7199|caption=Admiral pie}}{{ItemImage|id=21627|caption=Grimy fellstalk}}{{ItemImage|id=210|caption=Grimy irit}}{{ItemImage|id=3050|caption=Grimy toadflax}}{{ItemImage|id=3050|caption=Grimy toadflax}}{{ItemImage|id=220|caption=Grimy torstol}}{{ItemImage|id=220|caption=Grimy torstol}}{{ItemImage|id=21623|caption=Morchella mushroom}}{{ItemImage|id=2971|caption=Mort myre fungi}}<br />
+
{{ItemImage|id=2971|caption=Mort myre fungi}}{{ItemImage|id=238|caption=Unicorn horn}} || <center><div class="mw-collapsible mw-collapsed" style="min-width: 5em; max-width:60em">[[Admiral pie]], [[Admiral pie]], [[Grimy fellstalk]], [[Grimy irit]], [[Grimy toadflax]], [[Grimy toadflax]], [[Grimy torstol]], [[Grimy torstol]], [[Morchella mushroom]], [[Mort myre fungi]], [[Mort myre fungi]], [[Unicorn horn]]</div></center> || 15 - 35 || style="background-color:palegreen"|Common (30.0%)
+
|-
+
| {{ItemImage|id=1320|caption=Rune 2h sword}}{{ItemImage|id=1164|caption=Rune full helm}}{{ItemImage|id=1202|caption=Rune kiteshield}}{{ItemImage|id=1128|caption=Rune platebody}}{{ItemImage|id=1080|caption=Rune platelegs}}{{ItemImage|id=1094|caption=Rune plateskirt}} || <center><div class="mw-collapsible mw-collapsed" style="min-width: 5em; max-width:60em">[[Rune 2h sword]], [[Rune full helm]], [[Rune kiteshield]], [[Rune platebody]], [[Rune platelegs]], [[Rune plateskirt]]</div></center> || 6 - 18 || style="background-color:palegreen"|Common (18.0%)
+
|-
+
| {{ItemImage|id=560|caption=Death rune}} || [[Death rune]] || 160 - 270 || style="background-color:palegreen"|Common (17.0%)
+
|-
+
| {{ItemImage|id=1004|caption=Coins}} || [[Coins]] || 155000 - 310000 || style="background-color:palegreen"|Common (16.0%)
+
|-
+
| {{ItemImage|id=17648|caption=Promethium ore}} || [[Promethium ore]] || 1 || style="background-color:khaki"|Uncommon (10.0%)
+
|-
+
| {{ItemImage|id=7199|caption=Admiral pie}}{{ItemImage|id=7199|caption=Admiral pie}}{{ItemImage|id=21627|caption=Grimy fellstalk}}{{ItemImage|id=210|caption=Grimy irit}}{{ItemImage|id=3050|caption=Grimy toadflax}}{{ItemImage|id=3050|caption=Grimy toadflax}}{{ItemImage|id=220|caption=Grimy torstol}}{{ItemImage|id=220|caption=Grimy torstol}}{{ItemImage|id=21623|caption=Morchella mushroom}}{{ItemImage|id=2971|caption=Mort myre fungi}}<br />
+
{{ItemImage|id=2971|caption=Mort myre fungi}}{{ItemImage|id=238|caption=Unicorn horn}} || <center><div class="mw-collapsible mw-collapsed" style="min-width: 5em; max-width:60em">[[Admiral pie]], [[Admiral pie]], [[Grimy fellstalk]], [[Grimy irit]], [[Grimy toadflax]], [[Grimy toadflax]], [[Grimy torstol]], [[Grimy torstol]], [[Morchella mushroom]], [[Mort myre fungi]], [[Mort myre fungi]], [[Unicorn horn]]</div></center> || 35 - 80 || style="background-color:lightsalmon"|Rare (3.0%)
+
|-
+
| {{ItemImage|id=16907|caption=Promethium 2h sword}}{{ItemImage|id=17930|caption=Promethium arrowtips}}{{ItemImage|id=15771|caption=Promethium battleaxe}}{{ItemImage|id=16731|caption=Promethium chainbody}}{{ItemImage|id=16829|caption=Promethium dagger}}{{ItemImage|id=16709|caption=Promethium full helm}}{{ItemImage|id=16379|caption=Promethium hatchet}}{{ItemImage|id=17359|caption=Promethium kiteshield}}{{ItemImage|id=16401|caption=Promethium longsword}}{{ItemImage|id=16423|caption=Promethium maul}}<br />
+
{{ItemImage|id=16313|caption=Promethium pickaxe}}{{ItemImage|id=17257|caption=Promethium platebody}}{{ItemImage|id=16687|caption=Promethium platelegs}}{{ItemImage|id=16665|caption=Promethium plateskirt}}{{ItemImage|id=16953|caption=Promethium rapier}}{{ItemImage|id=17135|caption=Promethium spear}}{{ItemImage|id=17037|caption=Promethium warhammer}} || <center><div class="mw-collapsible mw-collapsed" style="min-width: 5em; max-width:60em">[[Promethium 2h sword]], [[Promethium arrowtips]], [[Promethium battleaxe]], [[Promethium chainbody]], [[Promethium dagger]], [[Promethium full helm]], [[Promethium hatchet]], [[Promethium kiteshield]], [[Promethium longsword]], [[Promethium maul]], [[Promethium pickaxe]], [[Promethium platebody]], [[Promethium platelegs]], [[Promethium plateskirt]], [[Promethium rapier]], [[Promethium spear]], [[Promethium warhammer]]</div></center> || 1 || style="background-color:lightsalmon"|Rare (2.0%)
+
|-
+
| {{ItemImage|id=1320|caption=Rune 2h sword}}{{ItemImage|id=1164|caption=Rune full helm}}{{ItemImage|id=1202|caption=Rune kiteshield}}{{ItemImage|id=1128|caption=Rune platebody}}{{ItemImage|id=1080|caption=Rune platelegs}}{{ItemImage|id=1094|caption=Rune plateskirt}} || <center><div class="mw-collapsible mw-collapsed" style="min-width: 5em; max-width:60em">[[Rune 2h sword]], [[Rune full helm]], [[Rune kiteshield]], [[Rune platebody]], [[Rune platelegs]], [[Rune plateskirt]]</div></center> || 22 - 38 || style="background-color:lightsalmon"|Rare (1.5%)
+
|-
+
| {{ItemImage|id=560|caption=Death rune}} || [[Death rune]] || 410 - 620 || style="background-color:lightsalmon"|Rare (1.4%)
+
|-
+
| {{ItemImage|id=17648|caption=Promethium ore}} || [[Promethium ore]] || 2 - 5 || style="background-color:lightcoral"|Very Rare (1.0%)
+
|-
+
| {{ItemImage|id=25658|caption=Mincien}} || [[Mincien]] || 1 || style="background-color:lightcoral"|Very Rare (0.1%)
+
|-
+
|}
+
 
+
[[Category:Monsters]]
+

Revision as of 13:06, 8 February 2023

Lucien Van Rot is the final boss of Rot cave.

He is immune to Rot and Poison damage. He is NOT considered undead even though he looks like a skeleton and is a necromancer. Salve amulet and Undead slayer does NOT work on him.

Entering different Rot cave instances will lead to different boss difficulty. Here's the following available instance choices:

  • Rot cave instance (2p). Meaning only 2 players can join the instance.
  • Rot cave instance (3p). Meaning only 3 players can join the instance.
  • Rot cave instance (4p). Meaning only 4 players can join the instance.

Rot cave instance (2p)

To enter Lucien Van Rot room, you need to decrease rot percentage till 75%. To achieve that, the best way would be to kill: 9-Rot zombie, 4-Haasghenahk, 1-Shukarhazh, Azzandra, Enakhra, Akthanakos and lightning up tomb in the bottom floor of rot cave. In the right corner you can see 2 player instance boss stats.

Rottwop.png

Mechanics

  • Lucien will mainly attack with his ranged autoattack. Praying ranged is advised throughout the entire fight. He will randomly cast a spell on his main target, spawning spikes underneath the player in a 7x7 square that will deal really high damage if the hit lands. The colour of the spikes determine the combat type it will hit as (red = melee, green = ranged and blue = magic). There are two ways to deal with this special attack. You can either switch your prayer to match the colour of the spikes, or you can simply leg it. Option number two is prefered since the attack is rather slow.
  • At 2000 HP he will spawn Worcestershire (more commonly known as Wahisietel). He will attack Luciens main target with rapidly ramping poison damage. this is where you can either switch from your dps aura, to poison heal aura, or you can sip an antipoison. the first option is strongly recommended since the strong poison hits can heal high and keep you safe throughout the entire fight. (sipping an antipoison will allow you to wear your dps aura but this is only recommended if you have a lot of experience with this boss). If you aren't the target of Wahisietel, you can simply attack him once and he'll attack you aswell.
  • At 1500 HPhe will spawn Akthanakoss. Akthanakoss will spawn rot zombies randomly that will quickly stack up. It is recommended to not focus them during the fight. Be aware high amount of rot zombies can cause serious damage when they are all stacked around you or when you are running in between them.(Especially if you wear low defence equipment like void armour).